This guide will explain how you can import measurement point metadata such as as-built photos and a location into the portal. It is assumed that you already have DomainObjects created for everything you want to import.
Make sure you have your exported data ready in a supported format (csv). For example in Excel this can be done by File -> Save as
Try to match the names of the columns to those used in the portal.
Now go to your portal and follow these steps:
- Open the Import page in your portal (if you don't see this page please contact our support)
- Click on New Import Job
- Select the CSV file and set the properties requested, the default should be ok. For more information on these settings please see the portal help (the "i" icon)
- When ready click on Upload
- You will be redirected to the detail view, on this page it is also possible to upload additional files for when you for example have a single file per object
- It is wise to first click Validate Job to make sure your uploaded files are correct (please note that it can take some time for the validation process to finish)
- Notice the bottom of the page for any warnings

- If needed correct these warnings with the Mappings option, use the PK checkbox to indicate that that field is used to identify an object
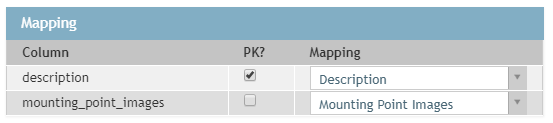
- If you use the same column names as the portal uses this should already be set correctly
- If needed click Validate Job again until all warnings are solved
- When everything looks OK click on Import Data
- You can view the progress of your import by looking at Status in both the detail view as the list, you do not need to keep the import page open. When done the status will be set to Imported
Importing images
Images can be uploaded by uploading them to the import job and referencing the files names in the CSV file so they can be attached to the right measurement point. Please note that this will overwrite any images already present for the property that is being imported. It is even possible to attach multiple images to a measurement point in a single import job. This works as follows:
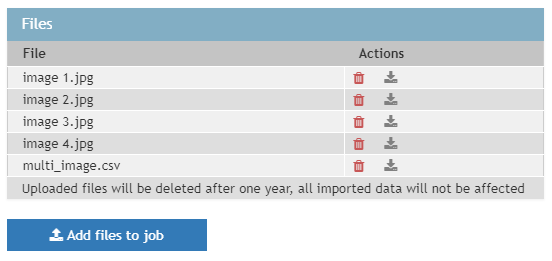
1. Use Add files to job to upload images that are to be attached to measurement points. It is also possible to upload all the images at once by uploading a zip-file that contains all of them.
2. The CSV file will contain the names of the images split by a | character if there are multiple.
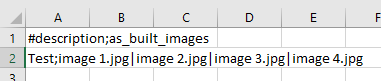
3. This ensures that the measurement point with description "Test" will have four as_built images attached to it after importing. This works exactly the same for cover_images, mounting_point_images or any other type. Any as_built images present before the import will be overwritten by this new import. They will not be added.
0 Comments